The Core Progression Philosophy
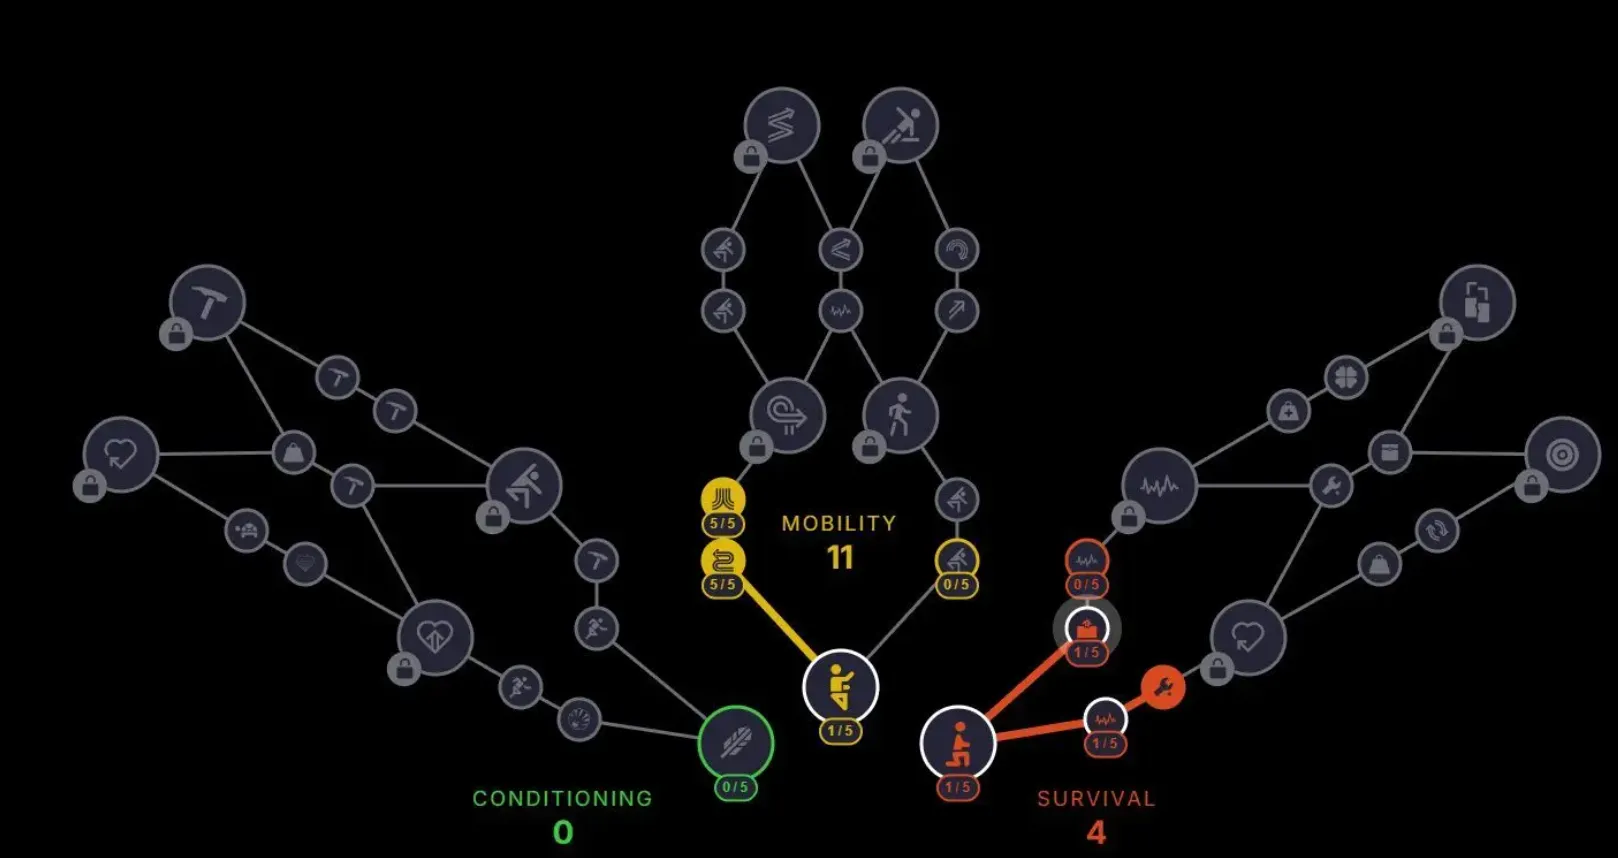
The Raider Skill Tree is your permanent anchor. Everything you unlock here—increased movement speed, higher resilience, faster gadget cooldowns—is retained, even if you are downed and lose all your scavenged gear. Progression is tiered, with higher tiers requiring significant amounts of Salvage, rare ARC Cores (dropped from elite enemies), and the completion of challenging Raider Missions. Spreading your resources too thin across all three trees is a common mistake. True mastery involves choosing one primary tree for a capstone goal (Tier V) and using the other two trees to gain essential supporting abilities (Tiers I and II).
I. The Survival Tree: Resilience and Sustainment
The Survival tree is arguably the most vital early investment for any Raider, regardless of their intended role. This branch focuses on enhancing your base armor integrity, accelerating health regeneration, and improving your ability to recover from being downed. If you are struggling with basic survivability or often find yourself the last one standing, this is your priority.
Survival Tier I - III: Establishing the Baseline
Tier I: Foundational Durability (200 Salvage). The immediate necessity here is 'Reinforced Armor Plating I', which grants a modest but critical increase to your base health pool. Equally important is 'Medkit Efficacy I', boosting the healing output of all scavenged medical supplies by 10%. This tier ensures you can withstand a few extra hits from low-tier drones.
Tier II: Rapid Recovery & Resistance (450 Salvage + 1 Core). This tier introduces highly valuable quality-of-life nodes. 'Downed State Stabilization' is a must-have, reducing the rate at which your health drains while downed, giving your teammates a larger window for revival. The 'Elemental Resistance' node (15% reduction to burn or shock damage) is crucial for fighting specific ARC units that rely on persistent damage effects.
Tier III: Revive Mastery (750 Salvage + 2 Cores). This tier is essential for squad play. 'Swift Revive Protocol' reduces the time needed to bring a teammate back into the fight by 25%. This speed boost can mean the difference between losing one teammate and a total squad wipe. The 'Last Stand Shield' node grants the recently revived player a small temporary shield, preventing immediate re-downing.
Survival Tier IV - V: The Immortal Capstone
Tier IV: Self-Sustainment & Damage Mitigation (1500 Salvage + 4 Cores). This tier focuses on keeping yourself independent. 'Passive Regeneration' is a high-value skill, starting a slow health recovery after a brief period (e.g., 10 seconds) of not taking damage, allowing you to conserve medkits entirely outside of active combat. 'Emergency Overshield' grants a small temporary shield boost whenever your armor drops below 20% health, saving you from quick burst damage.
Tier V Capstone: Resilient Will (3500 Salvage + 1 Legendary Core + Mission: The Unbroken). The ultimate defensive capstone. 'Resilient Will' grants you one free Self-Revive per deployment, meaning you can stand back up from a downed state without relying on teammates. Furthermore, upon activation, it gives all nearby allies a strong 5-second damage reduction buff. This perk completely defines the VANGUARD build, making you the undeniable tank and primary lifeline.
II. The Mobility Tree: Logistics and Evasion
The Mobility tree is for Raiders who prioritize efficient scavenging, rapid movement, and battlefield control. These skills are essential for the team’s logistician and anyone who needs to quickly traverse large maps or outmaneuver massive, slow-moving ARC units.
Mobility Tier I - III: Weight and Speed
Tier I: Foundational Movement (150 Salvage). The immediate necessity is 'Increased Sprint Speed I' (3% faster base sprint speed), crucial for crossing open ground safely. 'Roll Efficiency I' reduces the stamina cost of your combat dodge-roll by 10%.
Tier II: Carry Capacity & Scavenging (400 Salvage + 1 Core). This tier is crucial for resource collection. 'Extra Inventory Slot I' is one of the most important nodes in the entire game, permanently granting an extra inventory space to carry more high-value loot. 'Loot Radar I' slightly increases the detection radius for rare, hidden containers, improving your resource density per run.
Tier III: Verticality & Evasion (800 Salvage + 2 Cores). 'Grappling Hook Mastery' is a top-tier mobility skill, increasing the maximum range and speed of the Grappling Hook gadget by 20%. This greatly enhances your ability to reach high ground for sniping or execute fast, vertical escapes. 'Quick Stow' allows for 15% faster sheathing and readying of weapons, improving overall fluidity.
Mobility Tier IV - V: The Ghost Runner Capstone
Tier IV: Endurance and Consistency (1600 Salvage + 4 Cores). 'Unlimited Stamina Sprint' is a major investment, removing the stamina cost for sprinting while out of combat, allowing for nearly perpetual high-speed map traversal. 'Winch Durability' significantly increases the maximum stress threshold of your Winch cable, making risky high-altitude maneuvers much safer.
Tier V Capstone: Extraction Ace (3300 Salvage + 1 Legendary Core + Mission: The Final Dash). This capstone is the logistics specialist's defining trait. 'Extraction Ace' grants a 50% increase to the maximum carrying capacity of your final extraction backpack, maximizing profitability. Critically, it also reduces the initial call-in time for the final Extraction Beacon by 30 seconds, allowing for safer, faster exits under enemy pressure. This defines the GHOST RUNNER build.
III. The Conditioning Tree: Offense and Utility
The Conditioning tree is dedicated to maximizing your weapon efficiency, damage output, and the effective use of offensive utility gadgets. This is the tree for the team's primary damage dealer (DPS), who focuses on dismantling ARC weak points and controlling the battlefield with tools.
Conditioning Tier I - III: Weapon Fundamentals
Tier I: Foundational Damage (250 Salvage). The most direct damage increase. 'Calibrated Fire I' grants a passive 3% increase to base damage for all Primary Weapons. 'Utility Gadget Slot I' adds one extra slot for consumable gadgets (Mines, Trampolines, etc.), enhancing your battlefield control options.
Tier II: Weak Point Focus (500 Salvage + 1 Core). This tier is focused on strategic damage. 'Critical Strike Precision' increases the damage multiplier when hitting an ARC weak point by 5%. 'Weapon Swap Optimization' reduces the time needed to switch between your primary and secondary weapons by 20%, maintaining high damage flow.
Tier III: Reload & Sustainment (900 Salvage + 2 Cores). 'Emergency Reload Proficiency' provides a massive 25% faster reload speed when your magazine is completely empty, essential for survival in intense close-quarters combat. 'Gadget Damage Boost' increases the explosive or magnetic damage of all deployed gadgets by 15%, turning simple tools into destructive weapons.
Conditioning Tier IV - V: The Commando Capstone
Tier IV: Burst Efficiency (1800 Salvage + 4 Cores). This tier rewards skilled play. 'Roll & Fire' removes the movement speed penalty and accuracy reduction when firing immediately after a combat dodge-roll, promoting aggressive, mobile gunplay. 'Ammunition Conservation Matrix' grants a 5% chance to refund a bullet upon hitting an ARC weak point, effectively increasing your magazine size against large targets.
Tier V Capstone: Combat Flow (3700 Salvage + 1 Legendary Core + Mission: ARC Terminator). The defining perk of the DPS role. 'Combat Flow' causes every three successful hits on an enemy weak point to instantly reduce the cooldown of your primary Utility Gadget (e.g., Mine, Shield) by 1 second. Furthermore, achieving a critical kill grants you 10 points of temporary overshield. This capstone transforms the Raider into a constant source of damage and gadget deployment, defining the COMMANDO build.
IV. Strategic Build Synergy and Tier List Recommendations
The true power of the Skill Tree lies in synergy. You must decide on a primary role (Commando, Vanguard, or Ghost Runner) and invest accordingly, only dipping into the other two trees for essential, low-tier support nodes.
Recommended Build Paths
1. The Vanguard (Survival Primary): Maximize Survival (T5). Use Mobility Tier II for Extra Inventory (must-have for all builds) and Conditioning Tier I for Calibrated Fire (basic damage buff). This build is the squad's anchor.
2. The Commando (Conditioning Primary): Maximize Conditioning (T5). Use Survival Tier II for Downed State Stabilization and Mobility Tier III for Grappling Hook Mastery (to reach superior sniping positions). This build is the damage engine.
3. The Ghost Runner (Mobility Primary): Maximize Mobility (T5). Use Conditioning Tier III for Gadget Damage Boost (to defend yourself and loot) and Survival Tier I for Reinforced Armor Plating (basic health increase). This build is the logistics specialist.
Essential Universal Unlocks (Tier I-II Priority)
Regardless of your intended T5 capstone, these nodes offer disproportionate value and should be unlocked early:
- Mobility Tier II: Extra Inventory Slot I: More space equals more profit. Unquestionably Tier-S value.
- Survival Tier I: Medkit Efficacy I: Extends the life of your most important consumable resource.
- Conditioning Tier I: Calibrated Fire I: A straight 3% damage buff is always valuable.
- Survival Tier III: Swift Revive Protocol: Essential for saving missions in co-op play.
V. Conclusion: Investing in Permanence
ARC Raiders is a game where the loot you acquire is temporary, but the skills you unlock are permanent. Every Salvage point you extract should be seen as an investment in making your next raid easier and more profitable. The three trees—Conditioning, Mobility, and Survival—provide the foundational structure for highly specialized and synergistic squad builds. By focusing your resources, coordinating your team's T5 capstone goals, and prioritizing the universal Tier I-II unlocks, you will transform your Raider from a fragile scavenger into a true ARC veteran, ready to face the deepest threats the alien machines can throw at you.